Getting Started With John The Ripper On Kali Linux
John The Ripper has been around for a while, and is definitely a tool all hackers and pentesters use all the time. But if you are a beginner in this field, using John The Ripper is not necessarily straightforward. Don’t worry, I’ll explain everything in this article to help you get started the right way.
John The Ripper is a popular password cracker, working in command lines. It’s preinstalled by default on Kali Linux and can be used right after the installation.
Let’s see how to start it for the first time, and a few examples on how to use it.
Your essential Linux handbook
Want to level up your Linux skills? Here is the perfect solution to become efficient on Linux. 20% off today!
Download now
Getting started with John The Ripper
John The Ripper is an open-source password recovery tool, and is available on all operating systems and distributions. You can either download the source code and compile it, or use a release package for your system or distribution.
In this tutorial, I’m using Kali Linux, a distribution built for hacking and pen-testing, but you can use John on any other system if you prefer, the examples I give later will work the same way.
Install Kali Linux
If you don’t have Kali Linux yet, the first step will be to install it on your computer. It’s a Debian-based Linux distribution, including all the tools for pen-testers (network scan, vulnerability analysis, password recovery, wireless attacks, etc.).
You can download Kali Linux from the official website (on this page).
It’s available on most platform, you can even download virtual machines and containers. There is also a “Live” version that you can use on your computer without overwriting your current system.
Try it for free now, with advanced security features.
2900+ servers in 65 countries. It's free. Forever.
Once installed, make sure your network connection is working and do the system updates.
Then you can move on and start using John The Ripper as explained in the next section.
I have several other tutorials about Kali Linux, so feel free to check them if you want to try other tools:
- How To Remote Access Kali Linux
- How To Install & Use Wireshark On Kali Linux
- How To Easily Change Hostname On Kali Linux
Start John The Ripper on Kali Linux
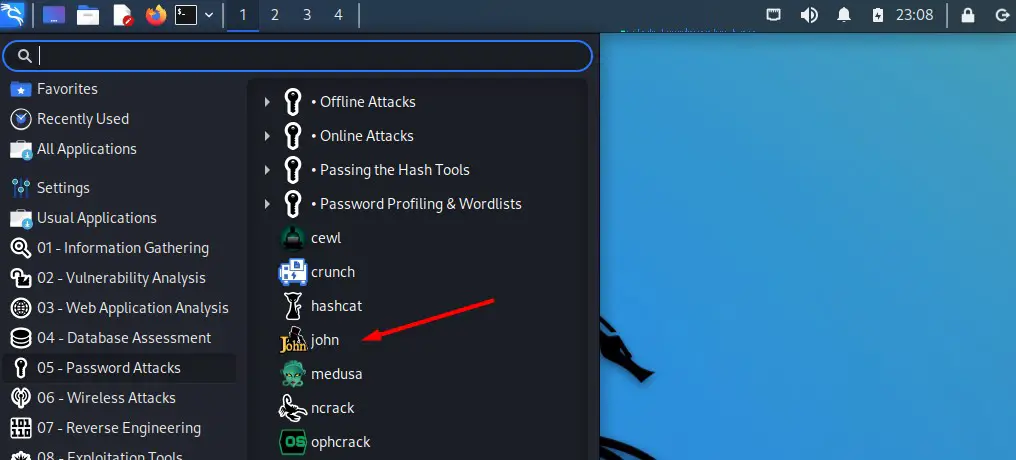
John The Ripper is preinstalled on Kali Linux. It’s available in the main menu, under “05 – Password Attacks”. The name of the app is simply “john”.
Download your exclusive free PDF containing the most useful Linux commands to elevate your skills!
But basically, there is no graphic interface for John The Ripper, so you can just open a terminal and type the command to use it:john <options>
That’s what the shortcut in the main menu will do.
How to use John The Ripper
As there is no graphic interface, using John The Ripper is not straightforward. Many options are available as optional argument to the command line, for various types of attacks and strategies.
Let’s try a few ones to give you an idea of the possibilities.
Simple example
First, you’ll need a password file, meaning a file on your computer containing one or more encrypted passwords that you want to crack. It can be anything:
- The /etc/passwd file on Linux systems (use the unshadowed version for recent distributions).
- Windows passwords.
- Or any list of passwords extracted from a database, like MD5, SHA1 or any other encryption algorithm.
For this example, I created a text file and added a bunch of MD5 passwords in it. You can use this tool to generate some if you just want to try John without having a concrete example to try yet.
Anyway, once this file on Kali Linux, you can use John to try cracking some of the passwords.
The default syntax will be:john --format=<passwords-format> <file>
In my case:john --format=Raw-md5 md5-passwords.txt
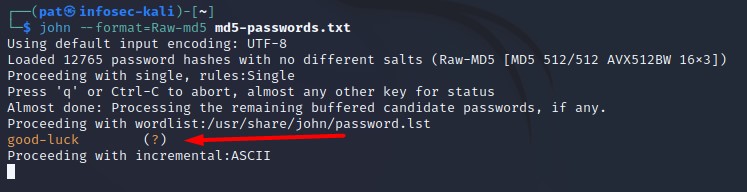
John will load your password file, and try a few algorithms to crack them (there is a minimal word list tested by default, and it will also use some incremental strategies).
In my test, I voluntarily added the MD5 hash corresponding to a word included in the word list, and it found it right away (“good-luck” was one of the MD5 encrypted passwords in my file). Feel free to add the same one to get a positive result.
Using a word list
Test word lists is the fastest way to get a few positive results if you have tons of encrypted passwords to test. Most users are using the same basic passwords in most applications (“password” and “qwerty” are still the most used passwords in the world).
But the default word list included on Kali Linux is pretty small. You might want to download and try bigger lists. There are many websites where you can find some of them, ranging from a couple of hundreds of words to giant files, over 100 GB for some of them.
Here is a GitHub repository where you can download a few of them. The biggest ones are not available (and most of the time they aren’t free), but it’s already good enough to do a few more tests.
For example, I downloaded the one name “darweb2017-top10000.txt” and tested it with John The Ripper to show you how it works.
The base command is the same, we just add the wordlist filename to it, like that:john --wordlist=<yourfile> --format=<format> <passwords-file>

This should be pretty fast, even for the biggest list, as John is optimized to do this quickly.
Feel free to create a shell script that will test all your lists in one run.
Bruteforce
But the most popular option to use John The Ripper for password cracking is the bruteforce method.
If none of your word lists gave a successful result, the last solution is to try random passwords.
Download your exclusive free PDF containing the most useful Linux commands to elevate your skills!
With John The Ripper, this strategy is named “incremental”, and you can use it with the “–incremental” option added to your command line:john --incremental --format=Raw-md5 md5-passwords.txt
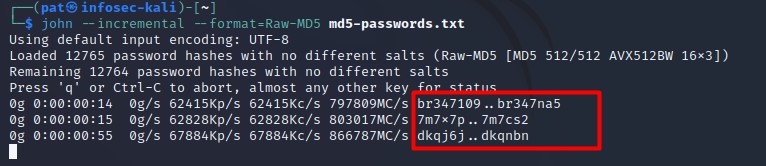
As you can see on the screenshot, it will try random passwords forever, until it find a match for all passwords in your list. You can use “CTRL+C” to stop John The Ripper and try other options.
If you have some insights about the passwords format, you can specify it in the command line.
For example, if you know that the passwords are most likely numbers only, you can use “digits” to ask John to only test digits:john --incremental=digits --format=<format> <password-file>
Join the Complete Ethical Hacking Course Bundle and step into the world of cybersecurity.
Learn to think like a hacker and protect systems with this comprehensive course.
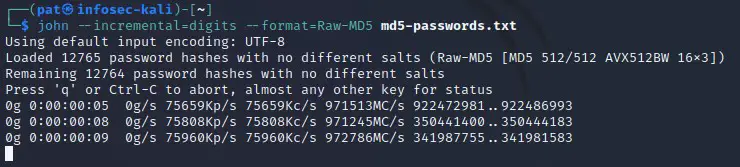
On this screenshot, we can see that John is no longer testing letters, only full digits. This will be way faster to test long passwords.
And the last option if you have even more insights is the “mask attack”. You can specify the exact format of the passwords you want to try. That’s basically when you noticed that most passwords follow the same patterns with the previous tests.
Maybe the system has been updated a few years ago, asking users to add a special character to their passwords, and they all added it at the end. Or may all passwords start with an uppercase letter, or end with their birthdate.
Even if you don’t have any insight yet, most users are using similar patterns for their passwords, so using mask attacks can really speed up the process. Here are, for example, the most common patterns found in the “Rock You” major data breach in 2009, and included with hashcat.
Here is how to use mask attacks with John the ripper:john --mask=<mask> --format=<format> <yourfile>
The mask basically describe the password format, using one of these elements or more:
- ?l : lower case letters
- ?u : upper case letters
- ?d : digits
- ?s : special characters
- ?a : any characters
- etc
As an example, in the next screenshot, I use “?u?l?l?l?l?s” which mean a six-characters password, starting with an uppercase, then four lowercase letters and ending with a special character:
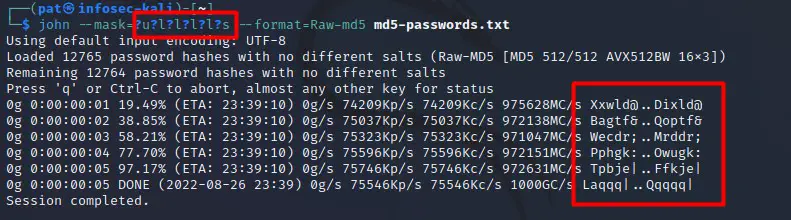
As you can see in the left red square, John is only testing this format, all tested passwords are following the mask I defined in the command line.
I hope this article gave you a sense of the possibilities with John The Ripper. If you need more examples or advanced options, you can check their online documentation (here).
I tend to prefer using Hashcat for that kind of stuff, but John The Ripper is a pretty good alternative.
Whenever you’re ready for more security, here are things you should think about:
- Break free from Gmail:
You should be able to choose what happens to your data. With Proton, only you can read your emails.
Get private email.
- Protect yourself online:
Use a high-speed Swiss VPN that safeguards your privacy. Open-source, no activity logs.
Get Proton VPN risk-free.
- Master Linux commands:
A sure method to learn (and remember) Linux commands. Useful ones only, one at a time, with clear explanations.
Download the e-book.