How To Change DNS Servers On Kali Linux (GUI & Commands)
Configuring a specific DNS server on Kali Linux is an essential step, yet the process might not be as straightforward as expected. While my usual go-to was editing the resolv.conf file, this method no longer holds for Kali Linux. I tested several methods (with or without GUI) and will share everything with you in this article.
The DNS servers for Kali Linux can be edited via the “Advanced Network Configuration” tool, available in the settings. In command lines, while /etc/resolv.conf still shows the current configuration, Network Manager should be used to edit it (nmcli).
No worries, I’ll explain everything in details. Let’s start with the instructions within the desktop interfaces, and we’ll do the same thing with commands after that. I’ll conclude this article by giving you a few tips to optimize and test your DNS settings.

Your essential Linux handbook
Want to level up your Linux skills? Here is the perfect solution to become efficient on Linux. 20% off today!
Download now
DNS Settings from the Kali Linux interface
Unlike distributions like Debian that are traditionally built for servers, Kali is generally used with a desktop environment. So let’s start with it first, and I’ll explain later how to do the same thing without it.
View the current DNS server
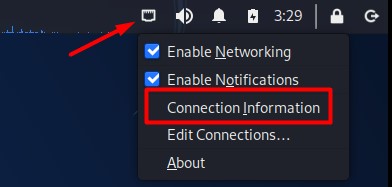
To see the current DNS server on Kali Linux, right-click on the network icon in the top-right corner of the interface. In the dropdown menu, click on “Connection Information”:
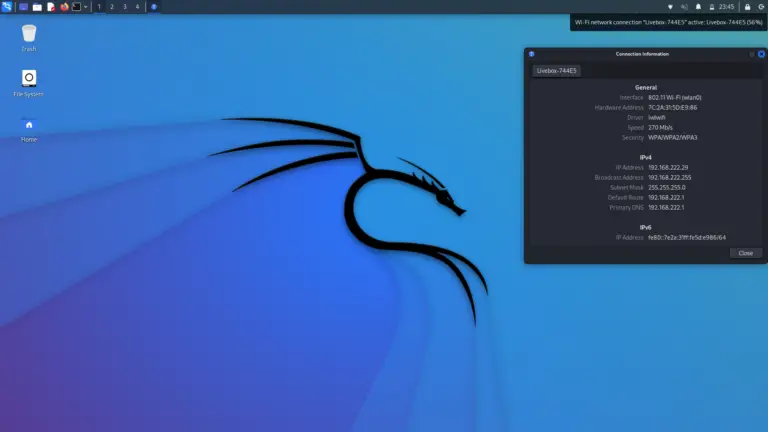
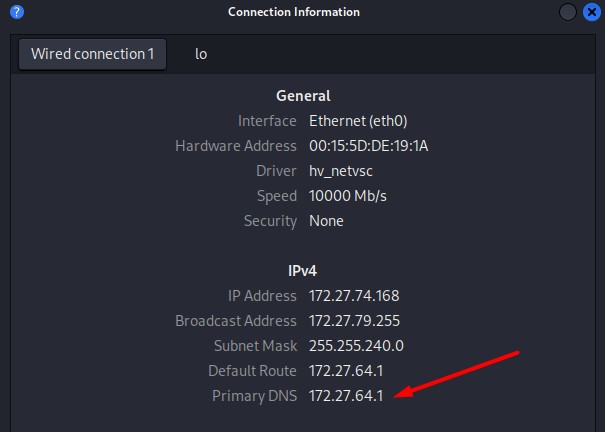
A new window shows up, where you’ll see all the current network configuration, including the IP address, subnet mask, default route (gateway) and the primary DNS server.
Try it for free now, with advanced security features.
2900+ servers in 65 countries. It's free. Forever.
So, on my screenshot, I can see that my primary DNS is 172.27.64.1. It’s a weird address because I’m testing this on a virtual machine, but in general, it will be your Internet router (192.168.0.X or 192.168.1.X).
Now this tool doesn’t allow you to change the settings, you can only view them. So let’s see how to change this DNS server.
How to change the DNS servers on Kali Linux
- Go into the settings manager and find “Advanced Network Configuration”.
It’s also possible to open it directly from the main menu, as it’s also available under “Settings”. - When you open it, you’ll see a list of your connections, double-click on the connection you want to edit.
- A new configuration window opens, with different tabs to configure everything.
Go to IPv4 Settings, it should look like that: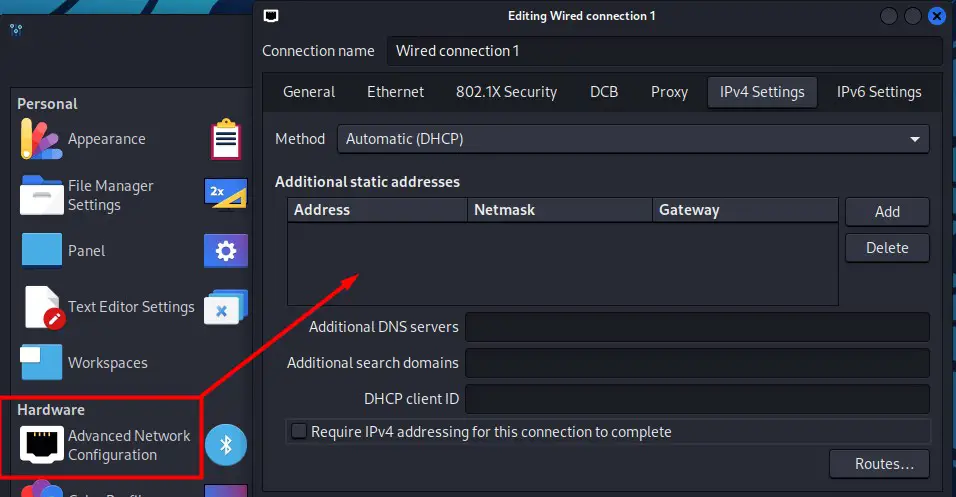
- You’ll see your current configuration, and can modify it from there if needed.
But let me explain a few things before touching anything here.
I guess that if you’re reading this, you never changed anything there. You’re using DHCP, which means your network router controls everything: IP address, gateway and DNS servers.
Download your exclusive free PDF containing the most useful Linux commands to elevate your skills!
If you want to try another DNS server, the easiest way is to fill the field “Additional DNS servers” with its IP address (ex: 8.8.8.8). It won’t remove your current ones, assigned by the DHCP server, but it will use it in priority, so it should be fine in most cases.
Note: If your computer is set up with a manual configuration, the field is at the same place, but simply named “DNS servers”.
Enter the IP address in the “Additional DNS servers field” and click “Save”.
You can use commas to separate multiple IP addresses if you have different servers to configure.
Once done, you need to disconnect and reconnect your network to apply the changes.
The easiest way to do this is to do a left click on the network icon (near the clock) and choose “Disconnect”. Then click back on it and click on your connection name (ex: “Wired Connection 1”) to reconnect. Once done, the new DNS will be set.
Note: If you are currently in DHCP and want to switch to manual, you can use the dropdown list named “Method” and switch from “Automatic (DHCP)” to “Manual”. You’ll need to set all the configuration manually (address, netmask, gateway and DNS).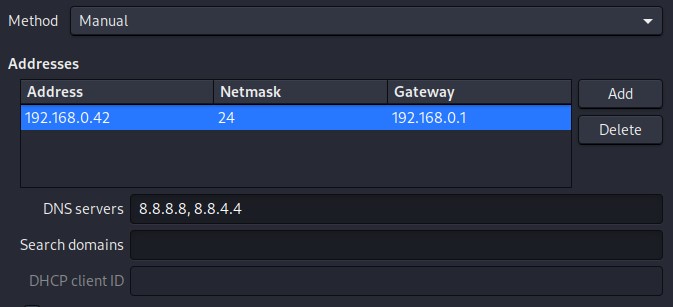
DNS Settings from terminal on Kali Linux
If you want to do the same thing from a terminal, it’s a bit more tricky, as you have Network manager installed, but it’s possible, and I’ll show you how.
View your current DNS configuration
The easiest way to view the DNS configuration on Kali Linux, as with most Linux distributions, is to display the content of the /etc/resolv.conf file.
Open and terminal and type: cat /etc/resolv.conf
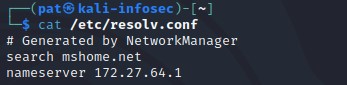
The lines starting with “nameserver” are followed by the IP address of the DNS servers you use.
Edit your DNS configuration
The /etc/resolv.conf shows the current configuration, but you can’t edit this file directly to update your DNS servers (or rather you can, but it will only work temporarily).
To change the DNS server on Kali Linux, when Network Manager is installed, do this:
- Start by listing your current connections, using:
nmcli con
- Now set the DNS server with:
nmcli con mod <connection_name> ipv4.dns <dns_server>For example:nmcli con mod "Wired connection 1" ipv4.dns 8.8.8.8 - Apply the changes by restarting the service:
sudo service NetworkManager restart
You can check in /etc/resolv.conf if the new server is present now. It should be added in first position.
If you don’t want to use the default DNS server assigned by your DHCP server, you can use this command:nmcli con mod <connection_name> ipv4.ignore-auto-dns yesRestart the Network Manager service and it should be OK.
What are the best DNS servers for Kali Linux?
Download your exclusive free PDF containing the most useful Linux commands to elevate your skills!
As a whole, providers like Google, OpenDNS, Cloudflare or Quad9 are the most popular choices for public DNS servers. They are faster, more reliable and provide increased security for the end-user.
Many times, it’s a smart move to trade in your current internet provider’s DNS server for something better. When it comes to this switch, trustworthiness and speed are big players (imagine the server crashing, and poof, there goes your internet; or if it’s sluggish, you’re stuck with sloth-like loading speeds).
I usually lean towards the larger ones, even though I understand that some of you might not be too keen on using Google DNS for your own browsing. Personally, I use it quite often and hardly encounter any problems.
Try it for free now, with advanced security features.
2900+ servers in 65 countries. It's free. Forever.
Here are a few of the most well-known DNS servers you can experiment with on Kali Linux:
- Google:
- Primary: 8.8.8.8
- Secondary: 8.8.4.4
- OpenDNS (now owned by Cisco):
- Primary: 208.67.222.222
- Secondary: 208.67.220.220
- Cloudflare:
- Primary: 1.1.1.1
- Secondary: 1.0.0.1
- Quad9:
- Primary: 9.9.9.9
- Secondary: 149.112.112.112
Tools and websites exist that can display the quickest option in your region if you’re interested. However, I reckon this might change quite often. (check DNS Perf for example).
How to test if the DNS is working on Linux
Once you’ve got the DNS server in place, you can make use of the “nslookup” command. This command lets you send out any DNS request and then verify the response from the server.
Let’s take an example. Just type this command:nslookupThen, type a domain name, for example:infosecscout.com
You’ll get something like that:

First, it shows you the server that’s being utilized. Then, you’ll receive the response from the main DNS server. In this case, it returns 3 different IP addresses (because of the CDN being used for the website). It’s all good to go!
You can specify a different DNS server (for a test or to check the secondary for example), just use:server <IP-ADDRESS>For example:server 1.1.1.1
And repeat the same test with a domain name:
That’s it! I think you now know everything to check the current configuration, update your DNS server and make sure it’s working properly.
Whenever you’re ready for more security, here are things you should think about:
- Break free from Gmail:
You should be able to choose what happens to your data. With Proton, only you can read your emails.
Get private email.
- Protect yourself online:
Use a high-speed Swiss VPN that safeguards your privacy. Open-source, no activity logs.
Get Proton VPN risk-free.
- Master Linux commands:
A sure method to learn (and remember) Linux commands. Useful ones only, one at a time, with clear explanations.
Download the e-book.