How To Install & Use VNC on Kali Linux (Remote access)
If you keep Kali Linux running on a remote computer (like a Raspberry Pi), having a way to access it from your computer can be interesting. Sure, you can always use SSH, but sometimes, access to the full graphical interface can be useful. That’s what VNC allows you to do.
VNC is a remote access protocol, pre-installed by default on the latest Kali Linux versions. It’s not started automatically, that’s the only thing to do to get access to the full interface from another computer on the same network.
Don’t worry, it’s not complicated, and I’ll guide you through every step, so you’ll be connected in a few minutes.
Your essential Linux handbook
Want to level up your Linux skills? Here is the perfect solution to become efficient on Linux. 20% off today!
Download now
How to install VNC on Kali Linux
Kali Linux comes with VNC pre-installed by default. VNC can be used right away on a fresh Kali Linux installation, the only requirement is to start the server and set a password.
I’ll show you how to do this in the next section, just know that there is no need to install anything on your Kali Linux system.
If for any reason, VNC is no longer available, you should find it in the default repository. Do a quick search for “vnc” or “vncserver” to find the exact package name:apt search vnc
Secure your spot in the Accelerator Program, with early access to exclusive resources.
Get 1000+ classes, unlimited mentorship, and more.
And then install it with:sudo apt install <package-name>
But as explained previously, this shouldn’t be necessary, as it’s already installed by default.
How to enable VNC on Kali Linux
VNC needs to be enabled, and a password must be set before the first connection. It can be done for one time use, or scheduled to start automatically on boot.
Let’s see how to do this.
One-time use
Download your exclusive free PDF containing the most useful Linux commands to elevate your skills!
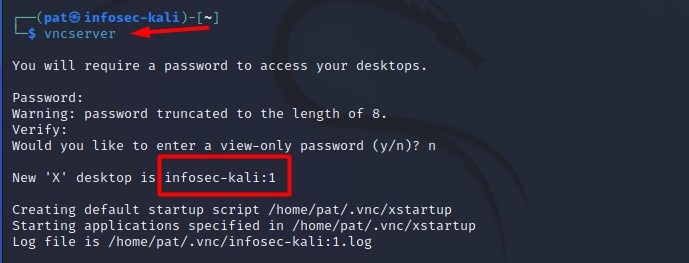
To start VNC server and create the password, you just need to use this command:vncserver
On the first run, you will be asked to provide a password (8 characters max). It will also give you the URL to access the session (infosec-kali:1 in my example).
Once VNC enabled, you can connect to it (read the next part of this tutorial to know how).
Warning: the “8 characters max” information is important here.
If you set “infosecscout” as your password, it will be truncated, so the real password will be “infosecs”. It’s not something we are used too in security (rather the other way around in general), so be careful.
Run automatically on boot
You can use different solutions to run VNC server automatically on boot, I won’t list all of them here. One of the easiest ways I have found is to add this line to my crontab:
- Open the crontab with:
crontab -eIf prompted, choose your text editor for this (Nano is recommended) - Go to the end of the file and add this line:
@reboot USER=pat /usr/bin/vncserver :1Obviously, replace “pat” with your username - Try a reboot of the computer, VNC should now start automatically on display 1.
How to access Kali Linux via VNC
Now that VNC server is running on Kali Linux, we’ll use a viewer on our computer to access the interface remotely.
Get the Kali Linux IP address
The first thing you’ll need is to know the current IP address of your computer running Kali Linux.
Sometimes you can use the host name (infosec-kali on my screenshots), but most of the time the IP address will be more stable.
If you have access to the desktop interface, you can do a right-click on the network icon in the top bar. Then click on “Connection information”. A window like this will show up:
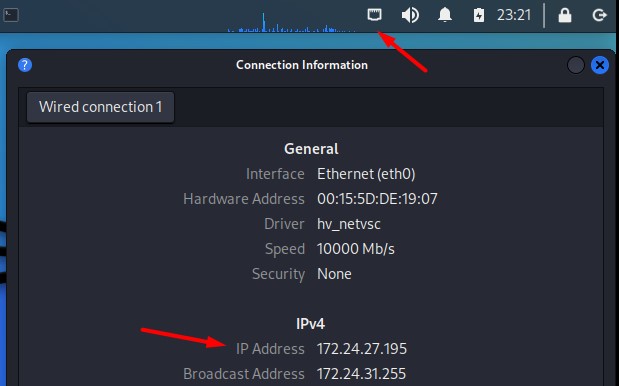
The IP address is mentioned under “IPV4”. In my example, it’s 172.24.27.195 (a random IP assigned to my test virtual machine).
For you, it will probably be something like 192.168.1.X or 192.168.0.X in most cases.
If you only have terminal access, or want to use the command line, you can try:ifconfig
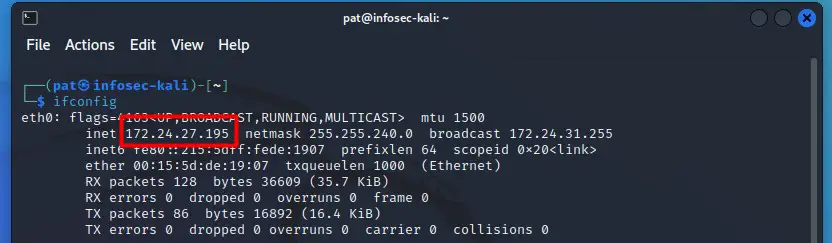
The IP address is mentioned on the second line, corresponding to the interface you are currently connected with (Ethernet ⇒ eth0, Wi-Fi ⇒ wlan0).
Whatever method you use, take note of the IP address, you’ll need it later to access your Kali Linux session.
Get VNC on your computer
You need a VNC client on your computer. Many options are available, but there are some proprietary reasons that make not of them compatible with Kali Linux.
The best option, in this case, is to use TightVNC. You can download it from here.
It’s free and available on any operating system.
Download your exclusive free PDF containing the most useful Linux commands to elevate your skills!
Once installed, you can’t use it directly.
There is a problem, though. The desktop environment won’t start automatically, and you’ll get a gray screen in VNC.
Here is how to fix this:
- Open a terminal or SSH connection.
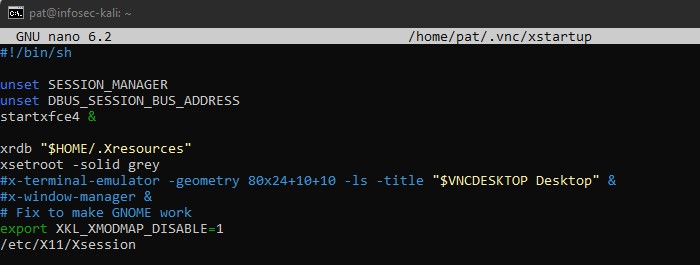
- Edit this file:
nano /home/$USER/.vnc/xstartup - Add these lines at the beginning:
unset SESSION_MANAGER
unset DBUS_SESSION_BUS_ADDRESS
startxfce4 &
Once done, it looks like that:
Enroll in the Complete Cyber Security Course now, and master online safety.
Learn to defeat hackers, protect privacy, and stay anonymous with over 50 hours of on-demand video.
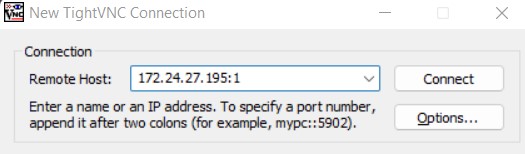
Back to your computer, type the URL given by the “vncserver” command you used earlier to start the service. In most cases, it will be something like “IP_ADDRESS:1”.
Don’t forget the display number at the end, the IP address alone won’t work.
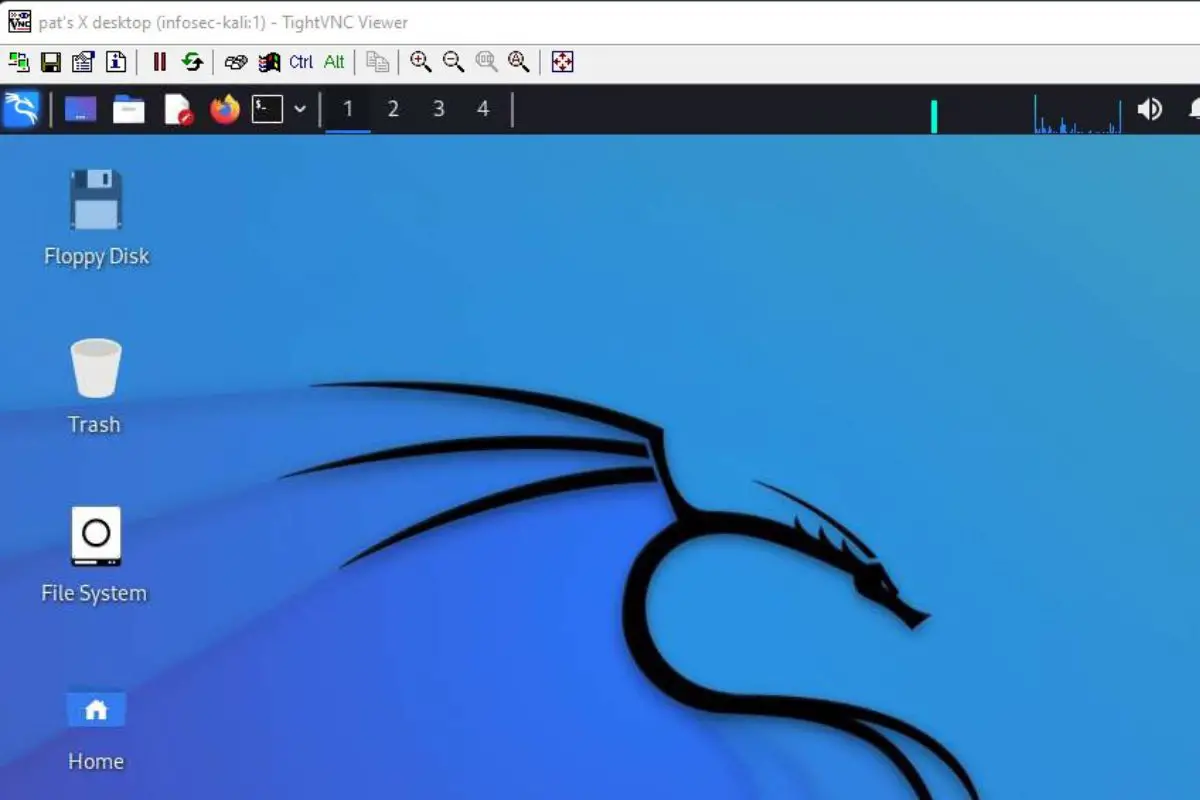
You’ll then need to type the password you created the first time you used “vncserver”, and should get access to the full interface:
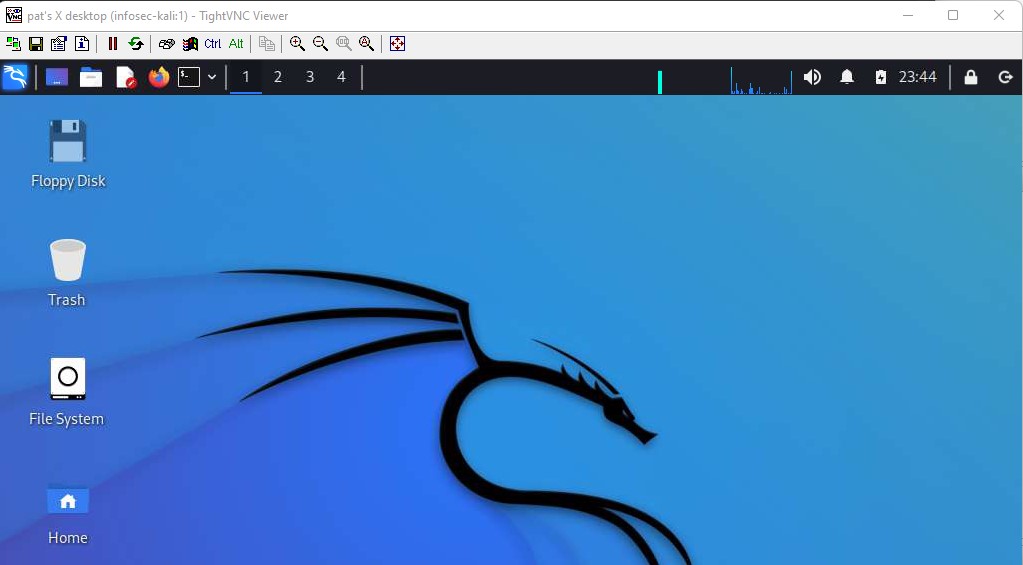
You can now use the full desktop interface.
Just remember that the screen will be active on the remote computer, and if there is a monitor plugged, everybody passing in front of the computer will see what you are doing, and can even use the mouse/keyboard to interact.
Also, make sure to close the session when you quit :-).
Now that you have access to Kali remotely, here are a few other tutorials that might be interesting:
- Kali Linux: How to Capture Screenshots Like a Pro
- Wifite: A step-by-step guide for Kali Linux users
- How To Login As Root On Kali Linux? (GUI & SSH)
Whenever you’re ready for more security, here are things you should think about:
- Break free from Gmail:
You should be able to choose what happens to your data. With Proton, only you can read your emails.
Get private email.
- Protect yourself online:
Use a high-speed Swiss VPN that safeguards your privacy. Open-source, no activity logs.
Get Proton VPN risk-free.
- Master Linux commands:
A sure method to learn (and remember) Linux commands. Useful ones only, one at a time, with clear explanations.
Download the e-book.