How to Install Raspberry Pi Imager on Kali Linux
Raspberry Pi Imager is an excellent tool to flash a new operating system to an SD card or USB drive for the Raspberry Pi. But it can also be used for other devices, basically to install any Linux system on an external media. Let’s see how to install it on Kali Linux in record time.
Raspberry Pi Imager is not available in the Kali Linux default repository. A package for Ubuntu is available on the official website, and can be installed on Kali with a few extra steps.
In this tutorial, I’ll list all these steps, so you can enjoy this great tool on your Kali Linux system. Don’t worry, it’s not that complicated once you have the right commands to do it.
Your essential Linux handbook
Want to level up your Linux skills? Here is the perfect solution to become efficient on Linux. 20% off today!
Download now
How to install Raspberry Pi Imager on Kali Linux
Kali Linux doesn’t include Raspberry Pi Imager in their APT repositories. It’s a bit surprising as it’s available on Ubuntu, but don’t worry, I have a solution.
Download Raspberry Pi Imager from the official website
Join the Complete Ethical Hacking Course Bundle and step into the world of cybersecurity.
Learn to think like a hacker and protect systems with this comprehensive course.
The first step is to visit the download page on the official website of the Raspberry Pi Foundation. Scroll down to the Raspberry Pi Imager part, and find the download link for Ubuntu.
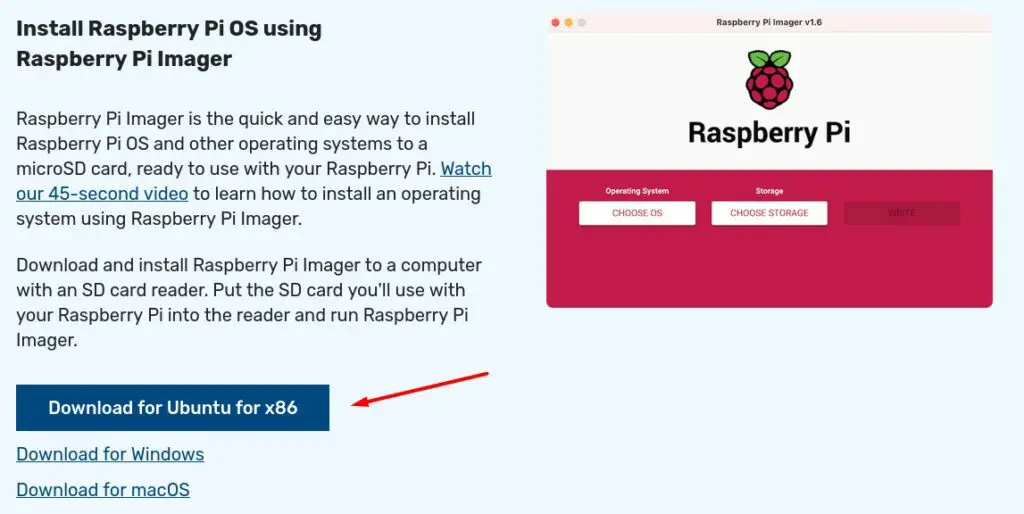
Yes, it says it’s for Ubuntu, but as both Ubuntu and Kali Linux are based on Debian, it will work on your system.
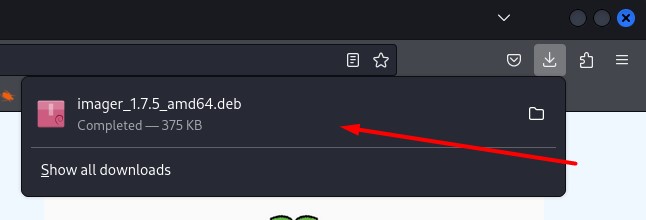
Make sure you get the .deb file on your computer (it will be stored in your Downloads folder).
You can’t install it directly by clicking on it as usual, as dependencies are required and won’t be installed automatically.
Install the downloaded package
Download your exclusive free PDF containing the most useful Linux commands to elevate your skills!
Once the Raspberry Pi Imager deb file downloaded from the Raspberry Pi website, here are the steps to install it:
- Open a terminal
- Go to your Downloads folder, by default it’s simply:
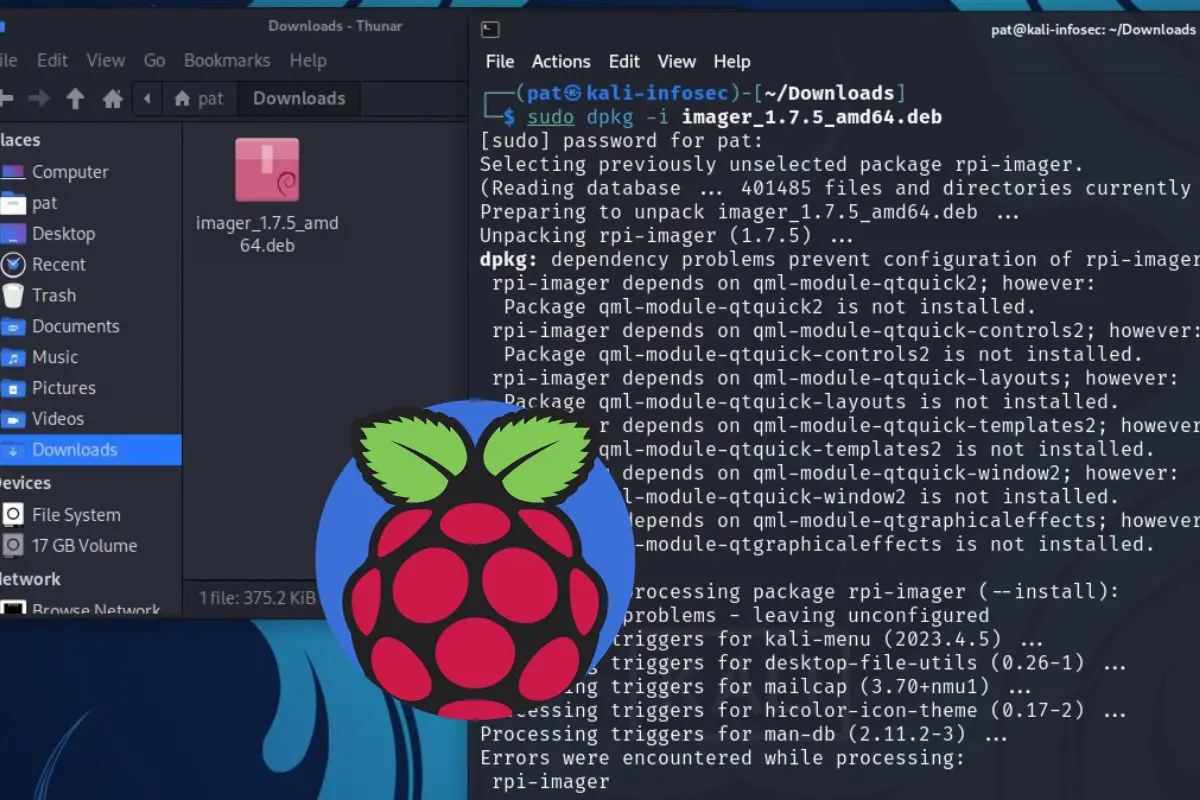
cd Downloads - Install the package with dpkg:
dpkg -i <package_name>So, in my example:dpkg -i imager_1.7.5_amd64.deb
You’ll get errors because there are missing dependencies, but it’s “normal”: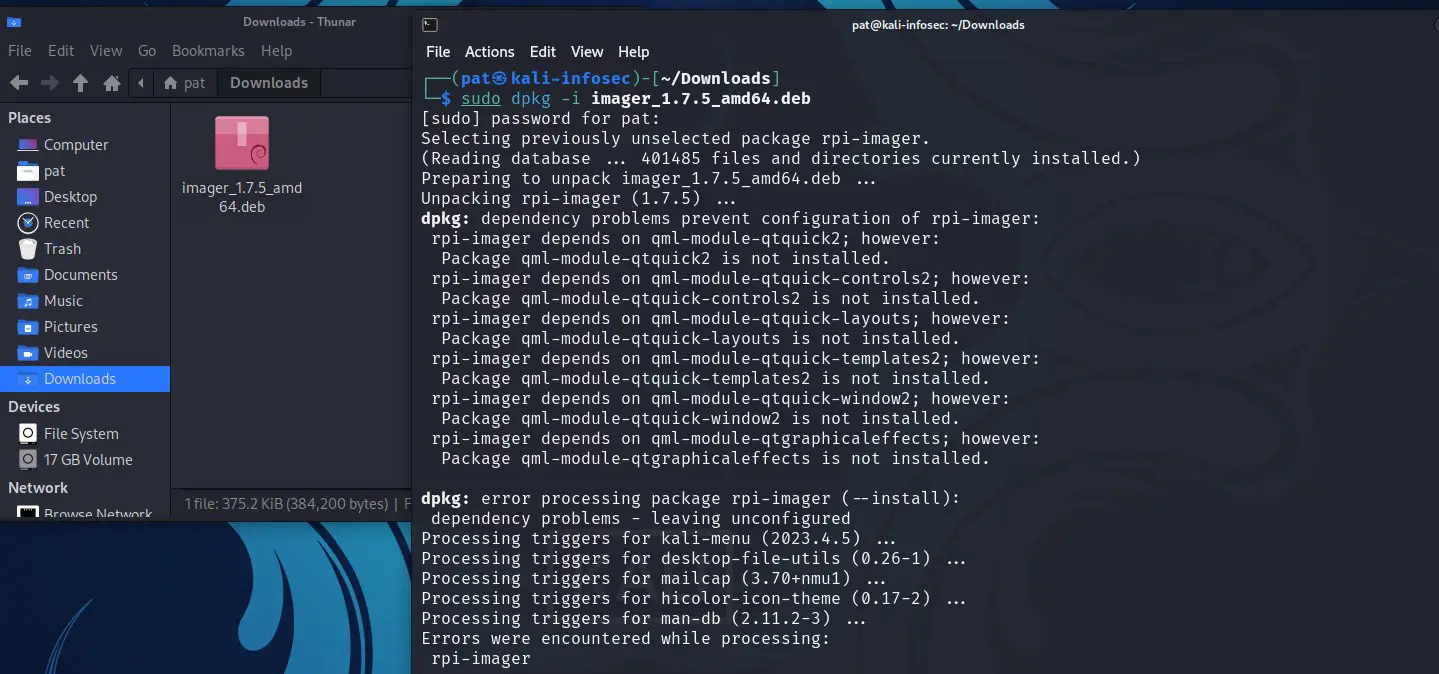
- To fix the errors “dependency problems prevent configuration of rpi-imager“, you can use:
sudo apt -f installWhich should install all the missing dependencies, and finally install rpi-imager on your system.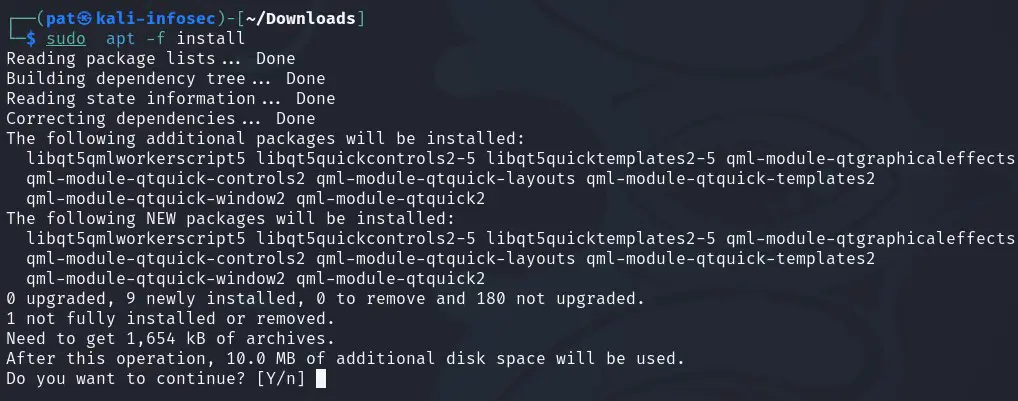 In my case, it was mostly QT libraries, like QML modules, as Raspberry Pi Imager uses them for the interface.
Press “Y” to confirm the installation of all dependencies and Raspberry Pi Imager.
Not as straightforward as we would like, but not unusual either. Many packages you get on the web require dependencies that need to be installed manually. Anyway, Raspberry Pi Imager should now be fully installed with the APT command.
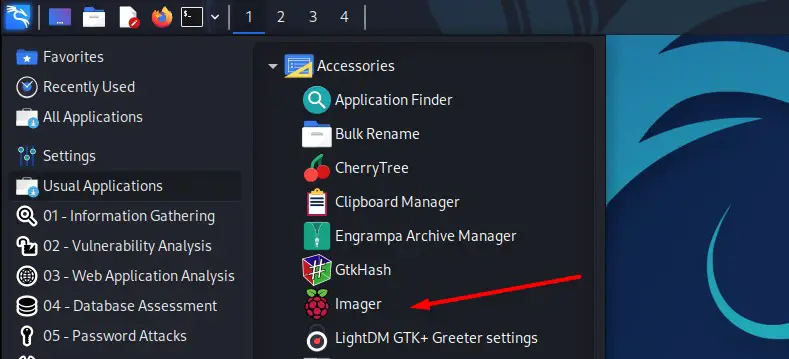
Once installed, Raspberry Pi Imager is listed in the main menu of Kali Linux, under “Usual applications” > “Accessories”:
How To Use Raspberry Pi Imager
Once Raspberry Pi Imager is installed, it can be used to flash any operating system to an SD card or a USB drive. Some operating systems are directly supported and can be installed in one click. And the other operating systems can be flashed by using a custom image.
Flash an operating system from the list
The basic usage of Raspberry Pi Imager is to flash a system available in the “OS List” to an external support. Here is how to do this:
- The default view of Raspberry Pi Imager looks like this:
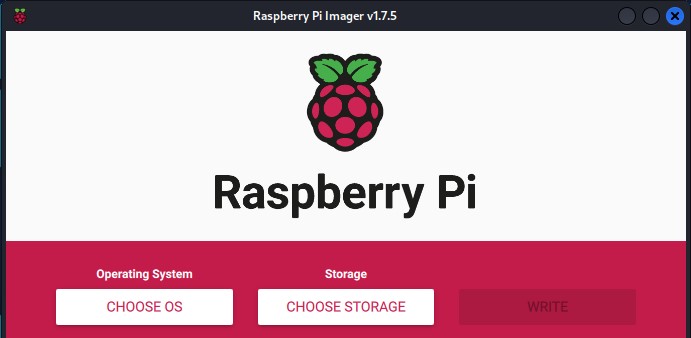
- There are three buttons:
– “Choose OS”, where you’ll get the OS list I’m referring to.
– “Choose SD card”, to select the external media.
– “Write”, to start the installation. - Click on “Choose OS”, and a menu like this will show up:
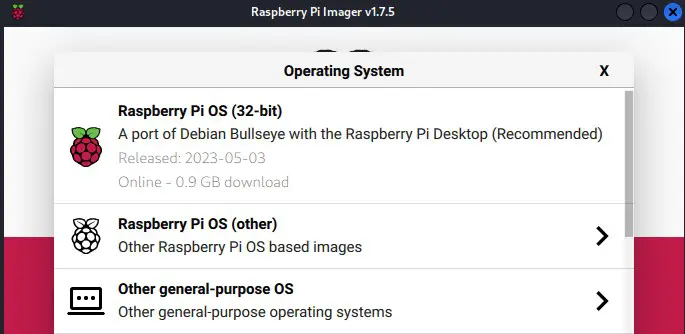
On the first line, you have Raspberry Pi OS with Desktop (32-bit version), which you’ll probably use most of the time if you have a Raspberry Pi. But then, you can also browse the different submenus to find other operating systems that are supported by this tool.
For example, in Raspberry Pi OS (other), you’ll find all the other versions of Raspberry Pi OS (64-bit, Legacy, without a desktop, etc.). In “Other general-purpose OS”, you’ll find well-supported distributions like Ubuntu or Manjaro, with all submenus for their different flavors.
Warning: These are all images for usage on a Raspberry Pi (ARM architecture). If you plan to use Raspberry Pi Imager for a traditional computer, jump to the next section in this article: “Flash a custom image”. - To continue this example, let’s click on “Raspberry Pi OS (32-bit)”.
The menu will close, and you can move to the next step. - Insert the media you’ll use to install your new system.
It can be an SD card if you have an SD card reader (integrated or via a USB adapter like this one), or a USB drive (like the flash disk I use all the time or even an SSD plugged to the computer via USB). - Click on “Choose SD card” and pick the corresponding drive from the list.
Make sure to not select media storage that you use for something else (the one used for the current OS is hidden, but if you have a backup drive or anything like that it may be listed there). - Once done, click on “Write” to start the installation process.
The installation will take a few minutes. It may take more time if you are flashing a specific image for the first time or if you have a slow internet connection.
That’s because Raspberry Imager will first download the image from the system maintainer and then flash it on your media storage. The second time you flash the same image, it will already be cached on your disk and will be installed faster (no download required).
It will be mentioned under the image name if the file is already cached on your computer.
Flash a custom image
Raspberry Pi Imager is not limited to the systems listed, and can be used to create an installation or live media for a traditional computer too.
It’s not because a distribution or architecture is not listed that you can’t use Imager to create a bootable media with it.
Download your exclusive free PDF containing the most useful Linux commands to elevate your skills!
For example, if you have downloaded an image manually from the official website of any distribution, you can also use Raspberry Pi Imager:
- Click on “Choose OS”.
- Then, select “Use Custom Image” at the bottom of the list.
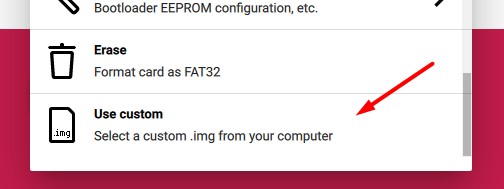
- A window will show up, asking you to pick the image you want to use.
All files formats are supported, you don’t even need to extract the file if the system image is compressed. - Then follow the same steps previously mentioned, picking the media you intend to use and clicking on “Write” to start the installation.
Raspberry Pi Imager advanced options
Since this tool was first released, the Raspberry Pi Foundation has remained focused on its development and has continued adding new features regularly.
Raspberry Pi Imager continues to improve with each new release, and I think it will become the preferred way to create new installation medias, whether you use a Raspberry Pi or not. Alternatives like Win32 Disk Imager, Etcher or Rufus will have to work hard to keep up!
Secure your spot in the Accelerator Program, with early access to exclusive resources.
Get 1000+ classes, unlimited mentorship, and more.
Let’s take a look at some interesting features you can already try with Raspberry Pi Imager.
Special features available in the OS list
You may have noticed that the OS list not only includes Linux distributions but also other tools:
- Misc utility images: In this subsection, you’ll find ways to update and change the bootloader on a Raspberry Pi, without having to install Raspberry Pi OS first. This can be useful if you want to switch from SD to USB boot or if you intend to try the new network boot feature on your Raspberry Pi.
- Erase: Quickly format your SD card or USB drive with this feature. You could also use Gparted as explained here, but Raspberry Pi Imager has this feature built-in.
Advanced settings
Last, but not least, if you use this tool for a Raspberry Pi, you can pre-configure your system before the first boot with the advanced options available for some distributions (especially for Raspberry Pi OS and Debian-based distributions).
After picking the distribution from the OS list, you may notice a fourth button that appears in the bottom-right of the screen:
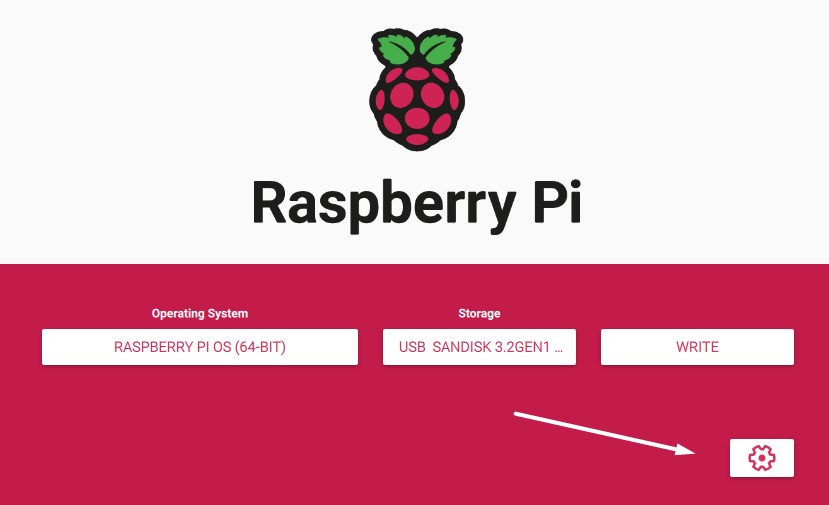
By clicking on it, you can set up the default settings for your new system. For example, you can create the first user and password (which is now a mandatory step on new installations), enable SSH or change the localization options (keyboard layout and time zone).
I encourage you to use this feature, especially if you regularly flash Raspberry Pi OS again and again. Personally, I do it almost every day, and I save a lot of time by filling out this form. You can choose to apply these default settings when selecting “to always use” in the dropdown menu at the top of the form.
Whenever you’re ready for more security, here are things you should think about:
- Break free from Gmail:
You should be able to choose what happens to your data. With Proton, only you can read your emails.
Get private email.
- Protect yourself online:
Use a high-speed Swiss VPN that safeguards your privacy. Open-source, no activity logs.
Get Proton VPN risk-free.
- Master Linux commands:
A sure method to learn (and remember) Linux commands. Useful ones only, one at a time, with clear explanations.
Download the e-book.