Disk Partitioning on Kali Linux: A beginner’s guide
Changing anything on the partitions table is an important task and can mess up your computer. In addition, on Kali Linux, you might have to do it with tools you are not used to. Don’t worry, I’ll explain everything step-by-step, and you don’t have to use tricky commands lines if you don’t want to.
A safe and easy method to edit the partition table on Kali Linux is to use a graphical tool, named “Gparted”. It’ll give you a visual representations of your disks and partitions, to preview your changes and apply them in a few clicks.
We’ll start with some prerequisites and information gathering, and I’ll then show you how to use this tool, or the command-line alternative if you have no other choice.
Your essential Linux handbook
Want to level up your Linux skills? Here is the perfect solution to become efficient on Linux. 20% off today!
Download now
Prerequisites to partition a disk on Kali Linux
Before starting any tool or command line, start by making sure you have everything you need:
- A better understanding of your current disks and partitions.
- A backup of your system in case something goes wrong.
- Gparted installed (if you want to use it).
- And maybe a USB key to boot on a temporary system.
Get an overview of your disks and partitions
The first step is to identify the partition you want to expand. In most cases, this shouldn’t be complicated.
On a desktop computer, you probably have one big partition, with your system and all of your files in it. You will need to be careful with more complicated installations, like if you have several hard drives, or if you divided your disk into several partitions (system, data, etc.).
For example, on my test system, I have only one hard drive (named /dev/sda) with two partitions (boot and /).
I can see that by typing this command in a terminal:df
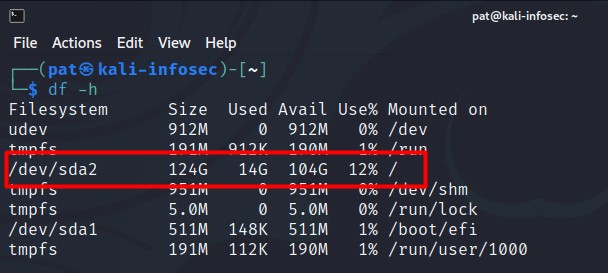
There, I can see that my main partition (/) is 124G and I use only 14G on it. The other partition (/boot) takes has a total size of 511M.
Join the Complete Ethical Hacking Course Bundle and step into the world of cybersecurity.
Learn to think like a hacker and protect systems with this comprehensive course.
The system name for the boot partition is /dev/sda1, and /dev/sda2 is the main system partition.
Backup your system now
When editing a partition table, you can easily break something which can result in your computer being unable to start again after your changes.
It’s highly recommended to create a backup of your data, especially for critical servers or files you don’t have anywhere else (don’t forget the configuration files).
If you can take a few minutes, even if it’s just to copy the essential files on a USB drive, it might save your life if something goes wrong.
Check if Gparted is installed
I think Gparted is installed by default on Kali Linux, but check if you can find it in the main menu. If it’s not the case, you can easily get it with apt:sudo apt install gparted
Download your exclusive free PDF containing the most useful Linux commands to elevate your skills!
Gparted is a tool I love to manage any partitioning task. In an intuitive interface, you can resize, create or delete partitions in a few clicks.
You can start it now to see your current disk partitions in a more visual way:
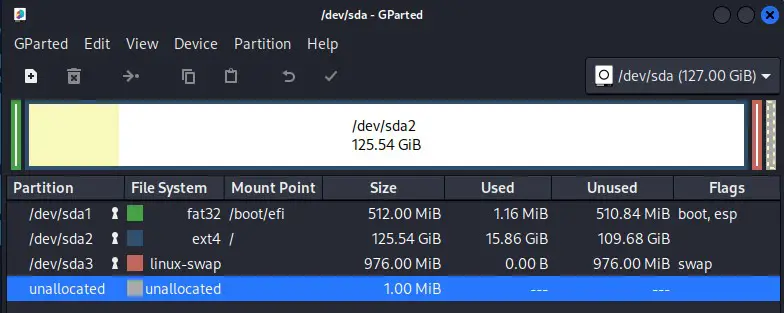
You can see the same structure as I guessed with “df”, but it’s easier to read, with all the details shown on one screen (including the mount point, file system, etc.).
If you have several drives, you can use the list in the top-right corner to switch from one disk to another.
Optional: Boot on a Live-USB key
If your goal is to resize the system partition, it’s not possible to do it on the current system. You’ll need to start the computer on a temporary media, and resize the system partition from there.
For example, if I want to shrink the /dev/sda2 partition to 64GB, I can’t do it directly from there. I need to first boot on another system, and do it from this temporary system. That’s why I consider booting on a Live USB key if you are in this situation.
When you boot on a Live-USB key, the system is no longer loaded from the hard drive, and we can unmount the partition safely.
It’s only required if your goal is to change the main system partition. For additional drives and partitions (let’s say if you have a partition /data with your personal files or applications), you can do it directly from your current session.
You can use a Live image of Kali Linux to do this. Download it from the official website and flash it to a USB key with your favorite tool (Balena Etcher is a good one).
You’ll then boot on it, and use Gparted on the live session.
Change the partition table on Kali Linux (GUI)
Whether you’re using a live system or your current Kali Linux system, the steps to resize a partition should now be the same.
Start Gparted
Find Gparted in the main menu and open it.
The goal is to get the same interface as I showed you before.
For this example, I’ve added a second drive to my system (named /dev/sdb), that looks like that:
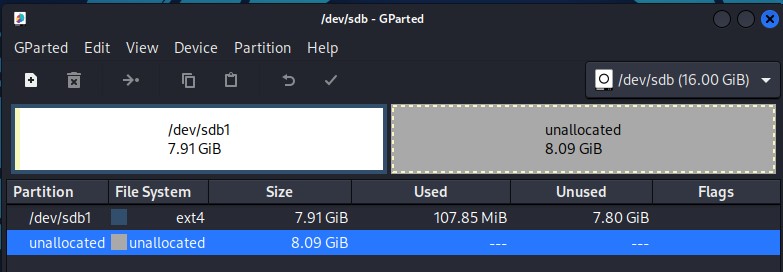
As you can see, I have only one partition on it (/dev/sdb1) which is not taking the whole space. I’ll show you how to extend the partition.
The steps are similar, whatever your goal is. It’s just to have an example to show you while I explain the steps.
Optional: Unmount the partition
If Kali Linux has mounted the partition you want to edit automatically, you need to unmount it first. This way you’re sure the system is not writing on it at the same time.
Download your exclusive free PDF containing the most useful Linux commands to elevate your skills!
You can easily do this directly from Gparted: Right-click on the partition and choose “Unmount”.
Extend the partition
Once Gparted opened, you can quickly resize any partition by following these steps:
- Make sure to select the correct drive in the top-right corner.
If you rebooted on a Live-USB key, the key is now probably /dev/sda and your system is on /dev/sdb. The partition number doesn’t change, just the drive name. - For example, let’s say you have something like:On /dev/sdb, I have one partition that is about 8GB, but my disk is 16GB total. I want to extend /dev/sdb1 to use the full size.
- Right-click on the partition you want to extend and choose “Resize/Move”.
This window shows up: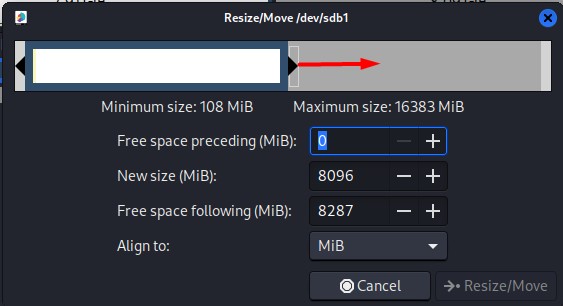
- From there, the easiest way would be to grab the right arrow on the graphical visualization and move it to the right. But you can also use the form below and update the new size field to the maximum value.
- Once done, click on “Resize/Move”. Gparted will show you the result directly.
- If it’s fine for you, click on the green tick to apply the changes.
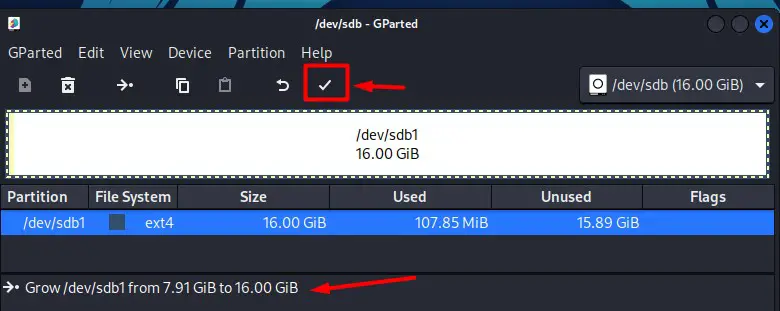
That’s it! After a few seconds (or minutes, depending on the size of your disk), your partition table has been updated, and you can now use your whole disk. If you are on a Live-USB system, you can now reboot your normal session and enjoy your new disk space.
Change the partition table on Kali Linux (Commands)
Overall, the steps to extend a partition from a command line are the same as with a GUI. You’ll just use different command lines instead of Gparted:
- Identify the partition name and the disk space available with fdisk.
- Unmount the partition with umount.
- Use resize2fs to extend the partition size.
When possible, I highly recommend using a Live-USB key with a GUI to do these steps. A mistake can easily happen, especially when you use the command line. Using the previous method will be easier and less risky.
Try it for free now, with advanced security features.
2900+ servers in 65 countries. It's free. Forever.
Only follow these steps when you don’t have access to the GUI and can’t reboot the computer (so when you are not resizing the system partition).
Warning: Before anything else, please make sure to back up your important files, personal data and configuration files. It’s always possible to have an error in the middle of the process, and be unable to recover anything on the computer.
Identify the partition to resize
On a server without GUI, we can’t use Gparted or the disk tool to find the partition name. In this case, the “fdisk” command will do the same thing for you:sudo fdisk -l
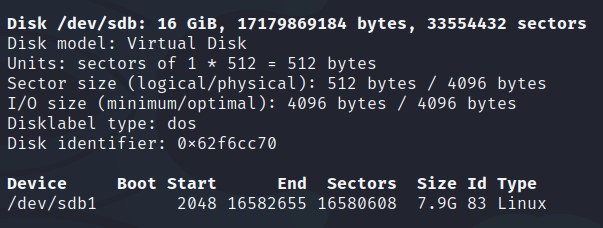
The output will include several paragraphs like the one in the pictures, each one corresponding to a physical disk. For example, in this screenshot, you can see the /dev/sdb drive, which is 16 G and contains a partition that takes only 8 G.
I will show you how to extend this partition to the full disk capacity.
Extend a partition from the command line
Here are the steps to follow to resize a partition from the command line:
- Make sure the partition is not mounted, use:
sudo umount /dev/sdb1
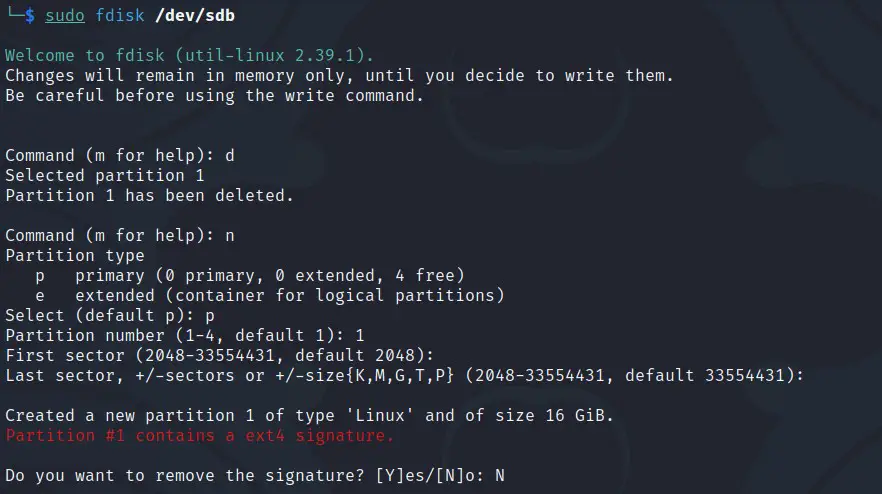
Adjust the parameter to fit your partition name (/dev/sdc3 for example). - Open fdisk to edit the partition table:
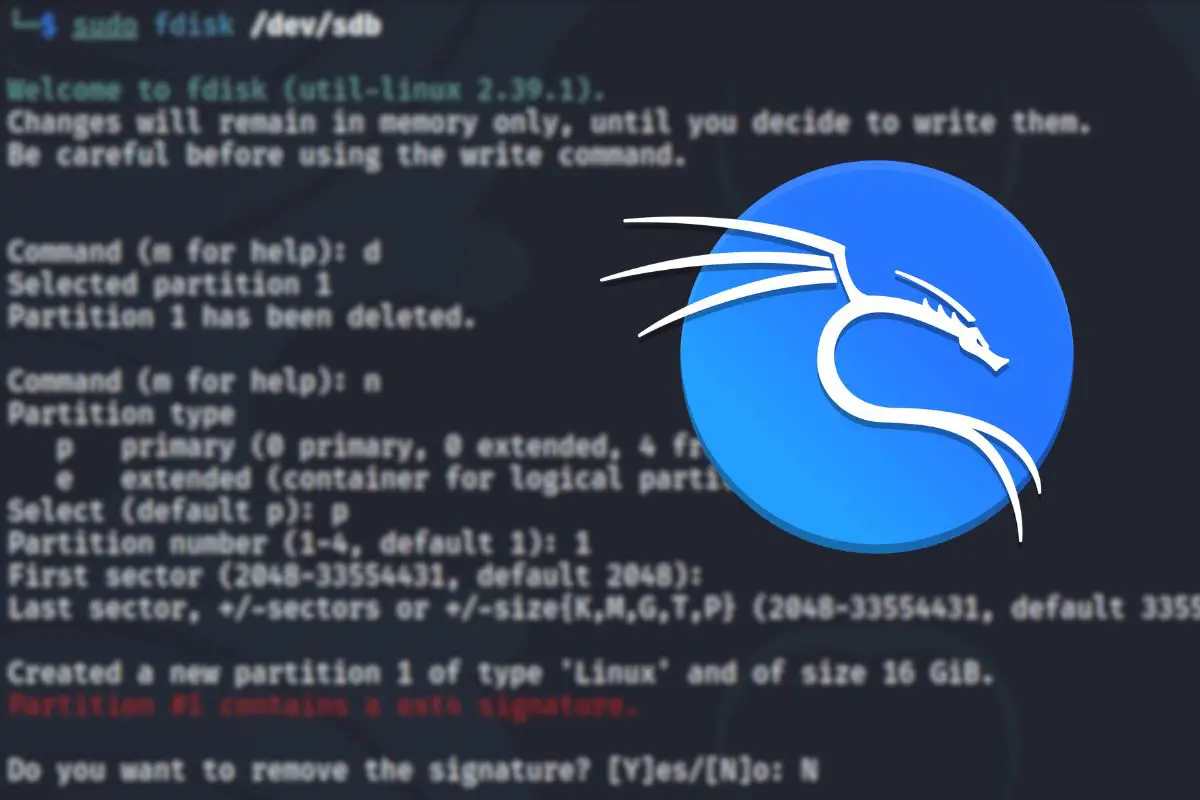
sudo fdisk /dev/sdb - Delete the existing partition:
dType the corresponding number (in my case I have only one partition, but if it’s /dev/sdb3 for example, you need to type “3”).
This step can be scary, but don’t worry, you shouldn’t lose your data as we don’t format the disk content (make sure to have a backup anyway!). - Create the new partition:
n
Answer the questions to create a new partition, you should probably keep the default values. Just set the new partition size by using something like “+8GB” for the last sector. - Check that the new partition table is what you wanted:
p - And if so, write the change to your disk:
w
Here is my full log if you are unsure at some point:
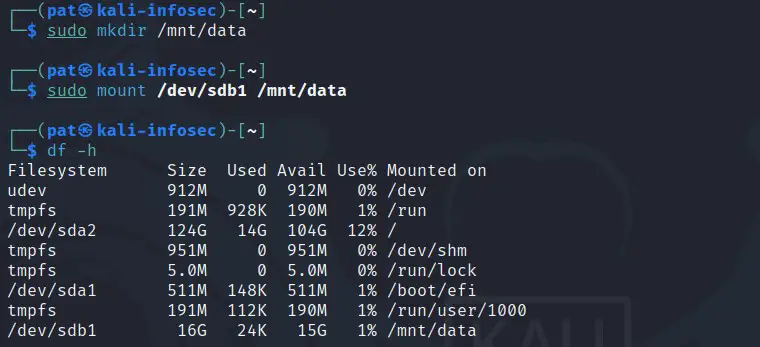
The last step is to actually resize the file system to fit the new partition size, you can do this easily with:sudo resize2fs /dev/sdb1
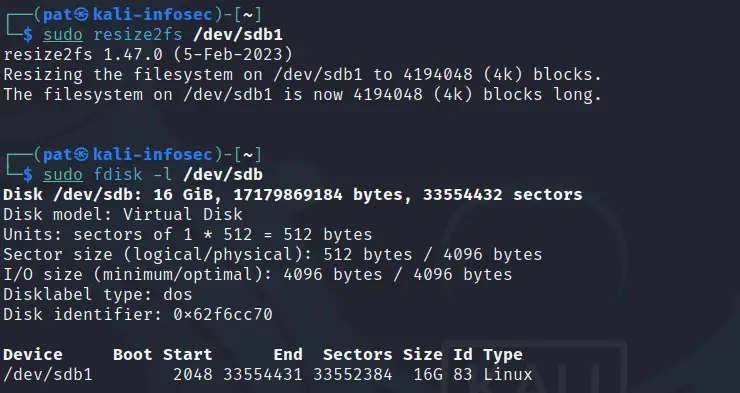
You can now mount your partition and enjoy more free space!sudo mount /dev/sdb1Or something like:sudo mount /dev/sdb1 /mnt/data
Now that you have ton of free space, what about trying something new on your Kali Linux system?
Here are some suggestions:
- Getting Started with Docker on Kali Linux: A complete guide
- Wifite: A step-by-step guide for Kali Linux users
- How To Remote Access Kali Linux
Whenever you’re ready for more security, here are things you should think about:
- Break free from Gmail:
You should be able to choose what happens to your data. With Proton, only you can read your emails.
Get private email.
- Protect yourself online:
Use a high-speed Swiss VPN that safeguards your privacy. Open-source, no activity logs.
Get Proton VPN risk-free.
- Master Linux commands:
A sure method to learn (and remember) Linux commands. Useful ones only, one at a time, with clear explanations.
Download the e-book.