How To Find The MAC Address On Kali Linux (5 ways)
The MAC address is a special identifier assigned to each network adapter. It helps you identify, authorize or assign specific IP addresses to each device. But finding the MAC address on Kali Linux may not be easy. That’s why I’ll explain how to do it in this tutorial.
The simplest way to find the MAC address on any Kali Linux computer is by using the “ip link” command in a terminal. This command shows all the network interfaces and their corresponding MAC addresses. A MAC address looks like a 12-digit code made up of letters and numbers (AA:BB:CC:DD:EE:FF).
In this tutorial, I’ll show you how to find the MAC address using the command line. I’ll also cover other methods you can use in different situations.

Your essential Linux handbook
Want to level up your Linux skills? Here is the perfect solution to become efficient on Linux. 20% off today!
Download now
Use the desktop interface to find the MAC address
If you use the main version of Kali Linux on your computer, with access to the desktop interface, finding the MAC address on it will be straightforward.
- Do a right-click on the network icon in the top-right corner of your screen.
- A dropdown menu shows up, click on “Connection information”.
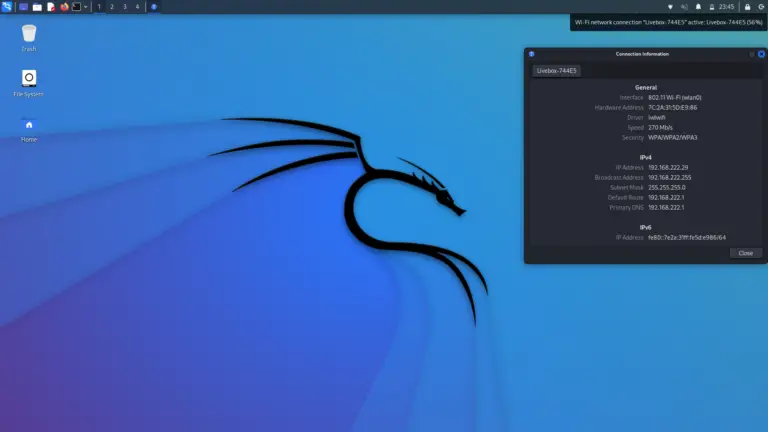
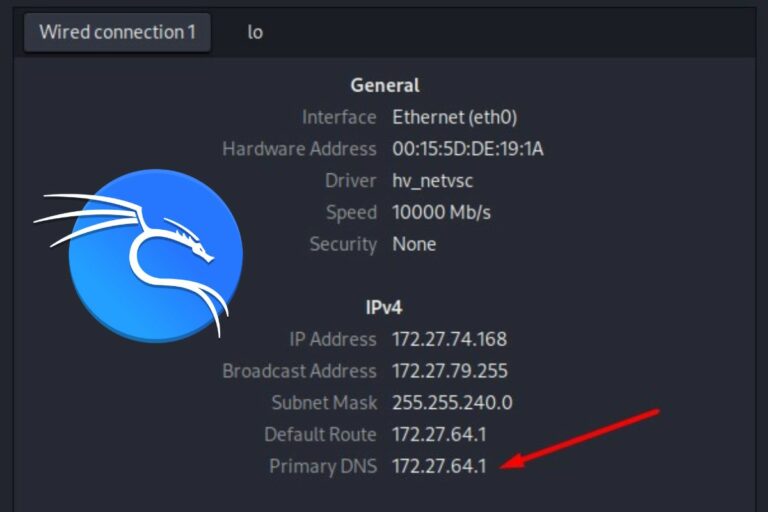
- In the new window that pops ups, you’ll get all the details about your current connection, including the MAC address:
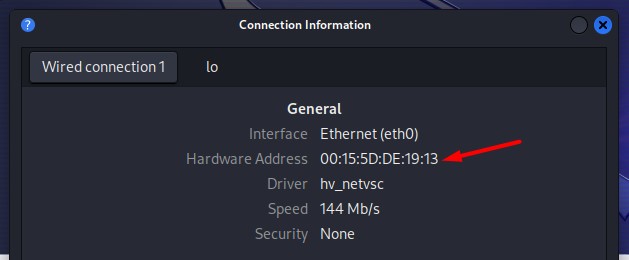
It’s named “Hardware Address” on this screen, but that’s precisely what you are looking for.
Join the Complete Ethical Hacking Course Bundle and step into the world of cybersecurity.
Learn to think like a hacker and protect systems with this comprehensive course.
That’s it, as you can see, when you have access to the full desktop environment, finding the MAC address will only take a few seconds. Let’s see now how to do the same thing using other methods.
Use the terminal to get the MAC address
Whether you use a minimal edition of Kali Linux, have no screen or are connected to it via SSH, it’s possible to get the MAC address of your computer by using only one command line.
When executing the “ip link” command on Kali Linux, it displays a list of all the network interfaces present on your computer. For each interface, you’ll find the MAC address mentioned after the keyword “link/ether”.
Download your exclusive free PDF containing the most useful Linux commands to elevate your skills!
Here is what it looks like on my virtual machine:
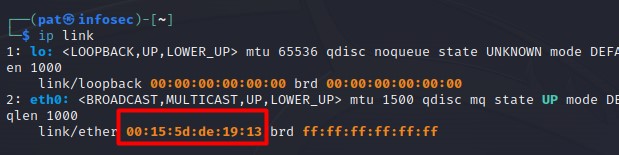
By default, the Ethernet adapter is named “eth0” (the wired connection) and the Wi-Fi adapter is named “wlan0” (wireless). Each one has a different MAC address, so if you use both, make sure to note the one you need.
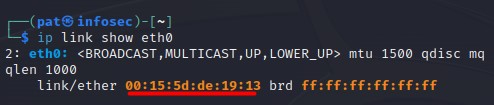
It’s also possible to simplify the result by showing only one interface. You can try this command, for example:ip link show eth0And you’ll only get the information about “eth0”.
So, as soon as you have access to the Kali Linux system, either via the desktop interface or just a terminal, finding the MAC address is not that complicated. Just one command to remember at worst.
But what if you can’t access your Kali system because you don’t know its IP address and don’t have a monitor on it? Let’s see how a network scan from another computer can also give you the MAC address.
Do a network scan to find the MAC address
If you need to obtain the MAC address of a device without actually connecting to it, you have the option to scan the network.
By doing a network scan, you can discover any devices connected to this network and see their respective MAC addresses. This approach allows you to gather MAC address information even when you’re not directly connected to the target device.
And so, it works for Kali Linux devices, but also for any devices on the network (computers, servers, network equipments, etc.).
My computers are generally running on Windows, and the tool I use for this is “Advanced IP Scanner”, here is how to use it:
- Start by downloading it here: https://www.advanced-ip-scanner.com/.
- Install it like any other application and then start it.
- Enter the network range to scan.
The software will detect it automatically.
I’m testing this with a virtual machine, so mine is a bit weird, but in general, it will be something like 192.168.0.1-254 or 192.168.1.1-254. - Press the “Scan” button.
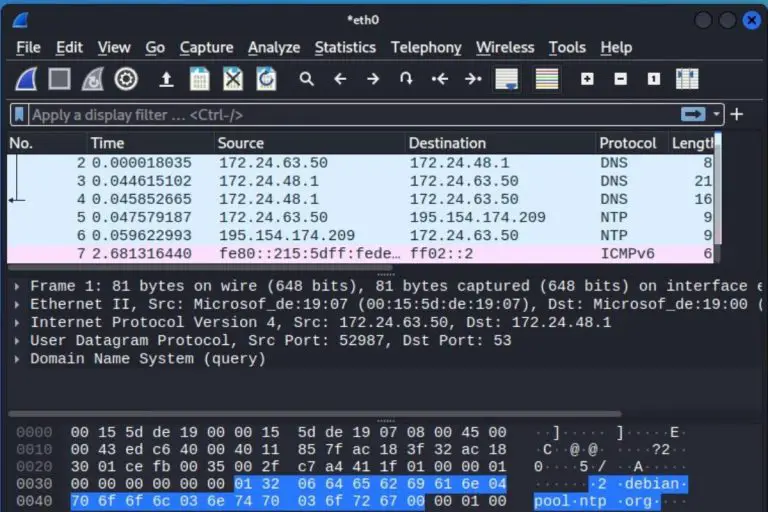
- After a few seconds, you’ll get the full list of your network devices, like this:
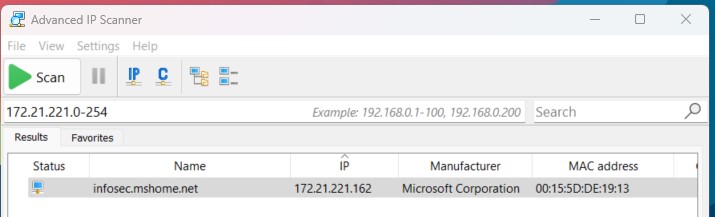
- As you can see, my virtual machine is detected, and I get the MAC address in the last column.
This tool is not available on Linux or Mac, but on other operating systems, you can install and use “nmap” to do the same thing:
- Install NMAP with:
sudo apt install nmapOr a similar command, depending on your distribution and the package manager it uses. - Run a scan on a specific network with:
sudo nmap -sn 192.168.1.0/24Adjust the IP range depending on your network configuration. - You should get a list of all devices, with their name, IP address and MAC address.
Get the MAC address with a script (Shell or Python)
The previous solutions should be enough 99% of the time. But if you want to go a bit further, need to automate things or just learn something new, here are two bonus methods to get the current MAC address on Kali Linux (by using Shell or Python scripts).
Option 1 – With a Shell script
Download your exclusive free PDF containing the most useful Linux commands to elevate your skills!
In a Shell script, the idea is simply to run several commands in a row.
We have seen a command to get the MAC address earlier, but there is no command that returns just the MAC address, so nothing very convenient to use in a script.
The easiest way I have found is to read the configuration file located here: /sys/class/net/eth0/address, which contains the MAC address. There is one file per adapter. I guess there are other options, but let’s go with this as an example:
Join the Complete Ethical Hacking Course Bundle and step into the world of cybersecurity.
Learn to think like a hacker and protect systems with this comprehensive course.
- Create a new file, for example:
nano get-mac.sh - Paste the following lines in it:
#!/bin/sh

if [ -e /sys/class/net/eth0 ]; then
       MAC=$(cat /sys/class/net/eth0/address)
else
       MAC=$(cat /sys/class/net/wlan0/address)
fi

echo $MAC - Add the execution right:
chmod +x get-mac.sh - Run the script with:
./get-mac.sh
It should give the MAC address of the eth0 adapter if it’s connected, or try the wireless adapter if it’s not the case (I hope you have at least one connected ^^).
Option 2 – By using Python
If you prefer Python to Shell, you can try something similar with it. I have found a PIP library named get-mac that makes it easy to get the MAC address of your computer, so I’ll go with this.
- If not yet installed, you need to install pip on your system:
sudo apt install python3-pip3
It was already installed on my Kali Linux virtual machine, but maybe I did it manually before writing this tutorial, I don’t remember. - Then install get-mac with the pip command:
sudo pip3 install get-mac
The project page is here if you need further details. - Once installed, create a new Python file with Nano:
nano mac.py - And use it in your Python script like this:
from getmac import get_mac_address

eth_mac = get_mac_address()
print(eth_mac) - Then run the script with:
python3 mac.py
- There are many options you can use. For example, to get the MAC address from a remote device or to specify if you want the eth0 or wlan0 address.
All the information is on the project website.
If you don’t want to install additional packages, another method I tested is to use default libraries (re and uuid) to get the MAC address in one line of Python code:
import re,uuid

mac=':'.join(re.findall('..', '%012x' % uuid.getnode()))
print(mac)
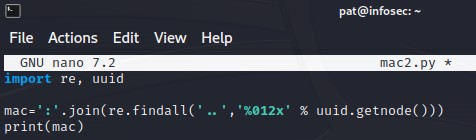
uuid.getnode() returns the identifier, and you need to use join and findall to format it the correct way. Less readable, especially if you’re not used to Python, but very efficient.
I hope that one of the 5 methods listed in this tutorial will fit your needs, you should now be covered for pretty much every situation, but who knows?
And if you want to learn more about Kali Linux, I have many tutorials on this website for you:
- Python on Kali Linux: A beginner’s guide to get started
- Does Kali Linux have a VPN client? (Get one for free)
- How To Install & Use Wireshark On Kali Linux
- Kali Linux Default Password: Default user, root & SSH tips
Whenever you’re ready for more security, here are things you should think about:
- Break free from Gmail:
You should be able to choose what happens to your data. With Proton, only you can read your emails.
Get private email.
- Protect yourself online:
Use a high-speed Swiss VPN that safeguards your privacy. Open-source, no activity logs.
Get Proton VPN risk-free.
- Master Linux commands:
A sure method to learn (and remember) Linux commands. Useful ones only, one at a time, with clear explanations.
Download the e-book.